Tutorial - Create animation from images
This tutorial will help you to learn how to create animated GIF images from your own pictures without using Animation Wizard.
To learn creating animation from scratch by drawing your own images, click here for other tutorial.
Step 1 - Prepare images
Prepare few image files, which you will use to create your animation. It is recommended that they all are of the same size.
Step 2 - Start new animation
On the File tab, click Create New Animation. If Animation Wizard appears, click Cancel to close it.
Step 3 - Add your images
- On the Frames tab, click Insert Frame.
- Select image files. You can select multiple files by holding down Ctrl key.
- Click Open.
For more information on adding images, read topic Add and Remove frames
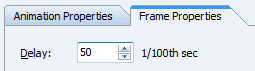
Step 4 - Customize frame display time (duration)
You can specify for how long every image will be displayed. By default display time is 0.5 seconds. You can change this for each frame.
Click a frame to select it. Then on the Frame Properties tab specify Delay to preferred value in 1/100 of a second increments (e.g. 100 will set image duration to one second).
Step 5 - Preview your animation
Click on the Preview tab. This will open GIF image player.
![]()
Step 6 - Save your animation
To save your image, on the File tab, click Save.
Notes
- You can use Up and Down arrow buttons on the left toolbar to move selected frame(s).
- To delete selected frame, on the Frames tab, click Delete Frame.